
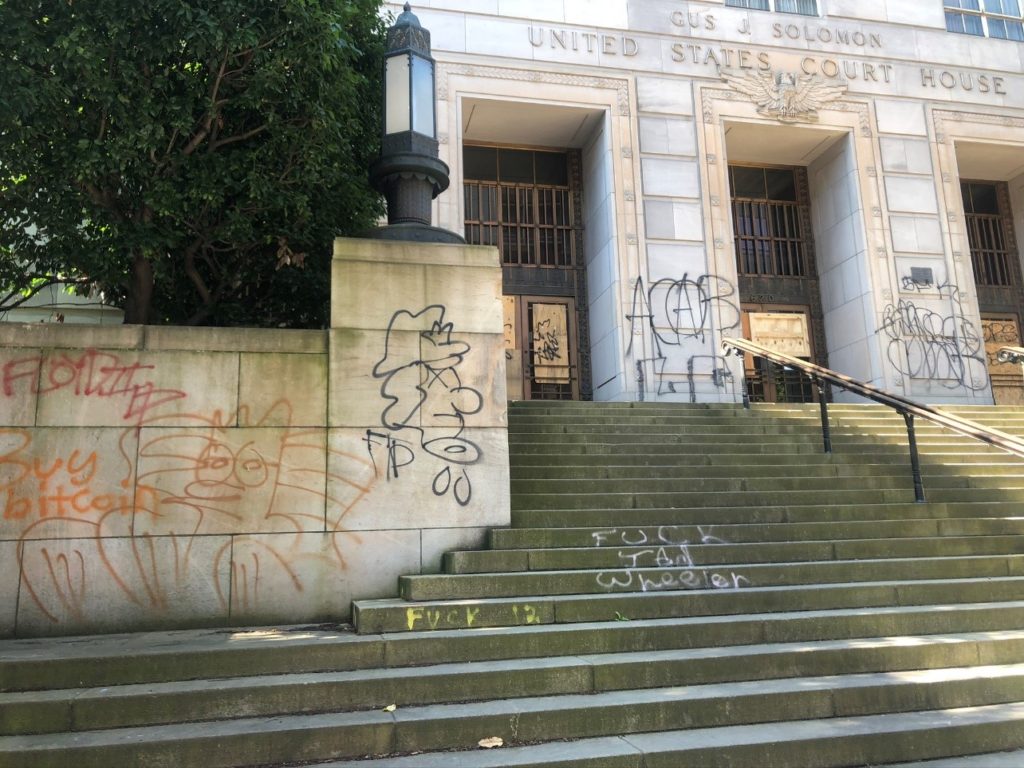
Removing graffiti from sensitive historic fabric is a very difficult and often very frustrating task. As a firm, we have responded to countless tagging events on all types of surfaces, from stone to metal to concrete. No tagging event can compare to the recent onslaught that was a result of the social unrest protests this past summer. Building owners and in some cases, well-meaning volunteers scrambled to remove the damaging and often offensive text as quickly as possible, but in many cases, difficult to remove shadowing remained or else the substrate was irreversibly damaged as part of the removal efforts. We thought it would be helpful to put together a series of quick dos and don’ts to help guide future graffiti removal efforts.
The frustrating part about graffiti removal is that there are so many different substrates, so many different tagging materials, and so many different graffiti removal products and removal procedures, it is hard to know what to use when. And the biggest temptation is to use the most aggressive procedure possible, but the two main risks are permanently damaging substrate or else driving graffiti deeper into porous materials such as stone, making the damage irreversible. When we are asked to respond to tagging events, our process is always to identify the least invasive method that provides the best results. To get to that point, we follow a very deliberate series of steps, which is listed below:
1. DOCUMENTATION / IMMEDIATE ACTION
A. Take photographs
B. Get the facts
- Date
- Time of event (or time of discovery)
- Substrate/Underlying material (granite, marble, limestone, sandstone, concrete, terra cotta, metal, etc.)
- Apparent graffiti material and color (spray-paint, marker, etc.)
2. TEST, TEST, TEST!
General:
- Conduct testing carefully as improper treatment can cause further damage to the substrate.
- Always test the mildest products and then work up to more aggressive products/methods.
- Test graffiti removal methods in a small inconspicuous area where possible. For areas where there are many types of substrates and paints, try multiple products. Do not attempt overall cleaning. Every type of paint on every type of substrate should be tested, even if the test locations are only 4”x4”:
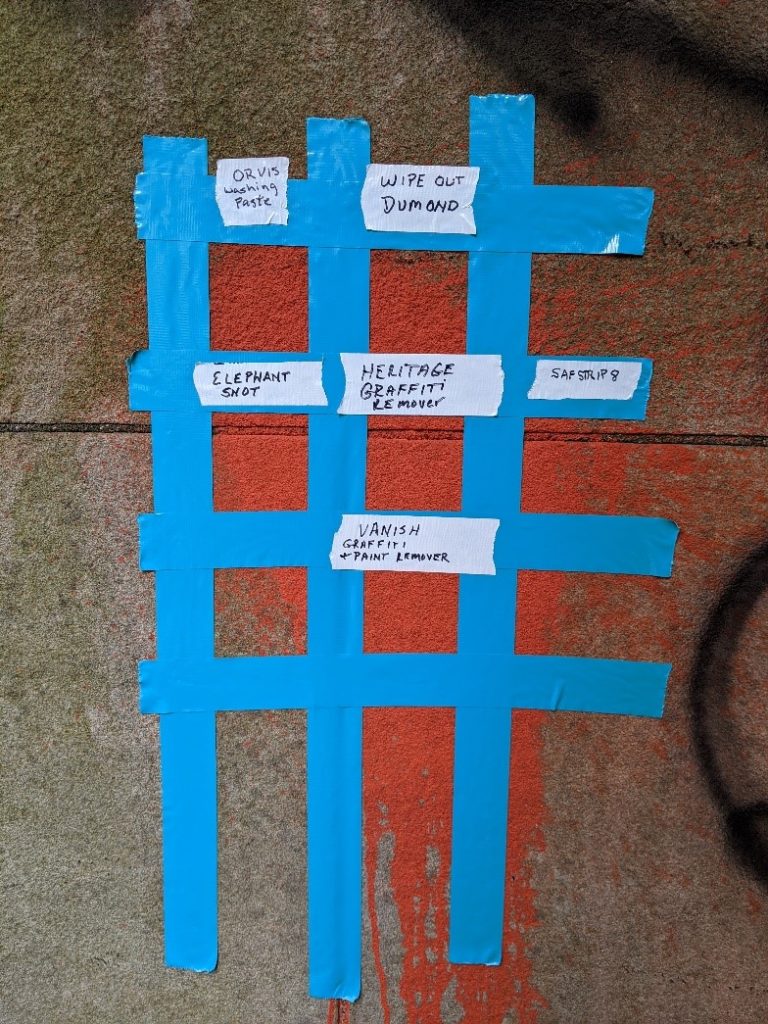 Image showing a 4”x4” mock of various paint removal products
A. Protect the surrounding substrate and finishes during the testing process.
B. If the tests are damaging, etching, or discoloring the substrate, stop the work immediately.
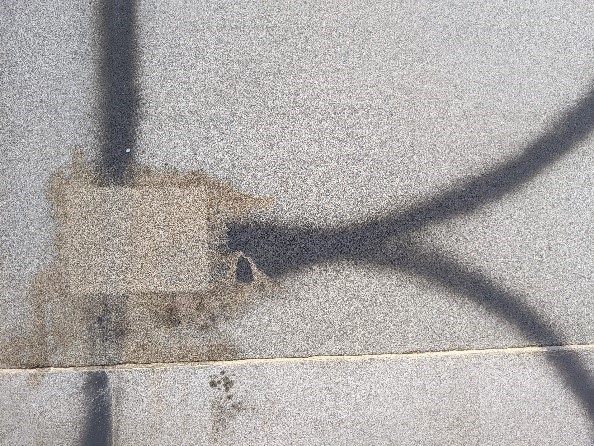 Image showing a mock-up where product changed stone color
C. Finally, full-sized mock-ups can be performed of the best-performing products. Mock-ups should be done joint to joint. Be aware that if the masonry hasn’t been cleaned in a while, the cleaned stone will look much lighter than adjacent stone.
D. Take photographs before, during, and after testing. Make sure to get overall photographs as well as detailed ones to help locate cleaned areas once the graffiti is removed.
3. PAINT REMOVAL PRODUCTS
A. Mild detergents: Mild detergents are commercial products that contain surfactants, which are good at isolating and removing particulates like soiling, chalk, and can cut through oily or organic materials.
B. Solvent-Based Paint Removers: Solvent-based paint removers work by swelling or re-emulsifying the paint and weakening its adhesion to the substrate. They usually contain some sort of surfactant to aid in rinsing. In some cases, the solvents used in them are the same solvents or even harsher ones than found in paint formulations and should be used with the appropriate safety precautions.
C. Caustic-Based Paint Removers: Caustic-based paint removers work slightly differently. These irreversibly break down the binder of the paint, so it can be washed away. Acidic paint removers have a pH between 0 and 4, neutral or near-neutral paint removers have a pH between 4 and 10 and alkaline paint removers have a pH between 10 and 14. All caustic paint removers need to be neutralized per the manufacturer’s instructions or they can “burn” the substrate or cause efflorescence and hazing. During rinsing, the pH of the cleaned surface should be monitored with full-range pH strips (pH 1-14). Once the treatment, including the application of any neutralizing agents, is completed, the pH of the rinse water should match the pH of clean water. Note that some manufacturers require that the cleaned surface be re-tested several days after to ensure complete neutralization. This is to ensure that efflorescence and hazing do not develop over time.
D. When to use solvent-based and when to use caustic paint removers? It depends on the substrate and the thickness and type of paint used, which is why testing is so important. Be sure you are using products appropriate for your substrate. It is best to start with neutral or near-neutral products and move on to stronger or harsher products based on those results. Knowing the type of graffiti that you are trying to remove can also guide your product testing as many products are tailored to certain types of graffiti or paint, such as marker and pen removers. As many municipalities have strict rules about what can enter sewer or runoff systems, paint removal waste may need to be contained and disposed of off-site. Always check with your local jurisdiction to confirm disposal requirements!
C. Poultices: A poultice is essentially an inert powder combined with water, solvents, or surfactants that is mixed into a paste and applied to the graffiti location. Diatomaceous earth, kaolin clay, and marble dust are the most common poultice powders, but several companies have their own proprietary powders. Usually, the poultice is covered for a period of time so that it can penetrate the paint or stain and doesn’t dry out too quickly. As the poultice dries out, the drying action of the poultice pulls out the paint or stain from the substrate pores. The downside of this process is that it is very labor intensive and not feasible for large surfaces of graffiti.
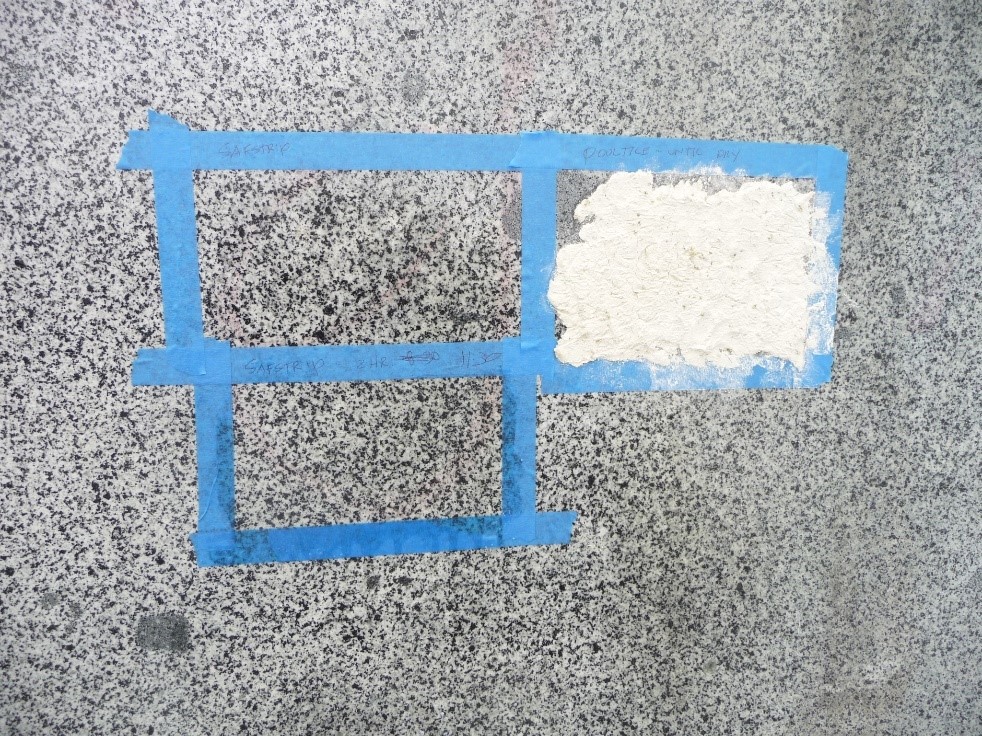 Far right square mocked up with poultice powder
4. CLEANING METHODS:
A. Mechanical Removal:
- Dampen the area with clean water.
- Where possible, try gently lifting the graffiti with a plastic or wood scraper followed by a dry nylon pad. Make sure pressure does not push the graffiti into pores of the substrate.
- Rinse clean with a mild detergent cleaner.
B. Pressure Wash Rinsing:
- Wash the area with graffiti with warm water applied at low pressure at 4 to 6 gpm. Begin with the lowest possible pressure and slowly increase as needed, staying within an appropriate range to prevent damage to the substrate (see NPS Preservation Brief Number 1 on recommended water pressures for masonry).
- If possible, use hot water, with a temperature between 140 and 180 degrees Fahrenheit.
- Use a fan-shaped spray tip that disperses water at an angle of at least 25 degrees.
- Hold the spray nozzle at least 12 inches from the surface being cleaned. If needed, tape a 12” dowel to the end of the wand to ensure that this distance is maintained.
- Apply water in horizontal back-and-forth sweeping motion, overlapping previous strokes to produce uniform coverage.
C. Graffiti Removers/Paint Strippers:
- Dampen the area to be cleaned with water if required by the manufacturer.
- Apply the product according to the manufacturer’s recommendations and agitate it using a brush.
- Allow the product to remain on the surface in accordance with the dwell time recommended by the manufacturer. Do not allow the product to dry on the surface.
- Following the dwell time, remove the excess product with a plastic or wood scraper and dispose in accordance with local, state, and federal regulations.
- Rinse off all traces of graffiti and chemical residue with pressurized water (see pressure wash rinsing section for best practices). Periodically during rinsing, test the pH of rinse water. Once the pH of the rinse water matches clean water, the product has been completely removed.
- Multiple layers of graffiti may require two or more applications of a paint remover or the use of several products.
D. Poultice: (this method is recommended where the graffiti has soaked into the substrate)
- Prepare the poultice by mixing clean water, solvent, or cleaning agent with poultice powder. Mix to a thick paste the consistency of peanut butter.
- Apply the poultice to the stained area about 1/4 to 1/2 inch thick, extending the poultice beyond the stained area by at least one inch. Spread the poultice evenly using a plastic or wood scraper.
- Cover the poultice with plastic and tape the edges to seal it. This will prevent it from drying out too rapidly.
- After about 24 hours, remove the plastic and allow the poultice to dry thoroughly, usually about 24 to 48 hours.
- Remove dry poultice gently by hand with a plastic or wood scraper, or non-metallic brush.
- Rinse clean with pressurized water (see pressure wash rinsing section for best practices).
- Some difficult stains may require multiple applications of the poultice and/or different types of cleaning agent.
5. ADDITIONAL RECOMMENDATIONS
A. Many paint removal products are most effective in mild temperatures (not too hot or cold). Read product guidelines closely for best results!
B. All brushes for scrubbing and application should be non-metallic. No metal brushes or scrapers should be used under any circumstances. Rolling is not generally recommended for application as the products are not worked into the surface to a sufficient degree.
C. 3M Scotch-Brite pads for delicate surfaces may be used where additional scrubbing power is needed. Do not use colored pads as the color may transfer to the stone.
D. During cleaning, stones should be treated from joint to joint to prevent the formation of halos that highlight the graffiti location on the cleaned stone.
E. All overnight testing areas should be covered with laminated paper and plastic sheeting taped on all sides to prevent the products from drying out.
F. During rinsing, the pH of the cleaned surface should be monitored with full-range pH strips.
G. When cleaning metal elements, ensure that the products tested are appropriate for use on metals, as inappropriate products can cause deterioration and discoloration, loss of patina, and permanent damage. Many exterior elements made of brass or bronze have a lacquered or waxed coating and the repair should be appropriately formulated.
H. Remember, poor removal techniques can cause more harm than good. When it comes to addressing graffiti on irreplaceable historic fabric, if possible, work with a professional conservator or mason and make sure the processes listed above are carefully followed!
 Images showing marble cleaned by professional masons using a propriety cleaning system that uses low pressure and micro-abrasive powders to remove paint.